KI für Astro-Foto-Entwicklung nutzen / Using AI for Astrophotography Image Processing
18.08.2026 | AI | Astronomie
… scroll down for english version …
In dem ersten Artikel zur lokalen KI wurde erläutert wie man eine KI-Umgebung grundsätzlich einrichten kann. In diesem Teil wird gezeigt, wie man die KI als persönlichen Coach einsetzen kann, um seine eigenen Fähigkeiten zu erweitern.
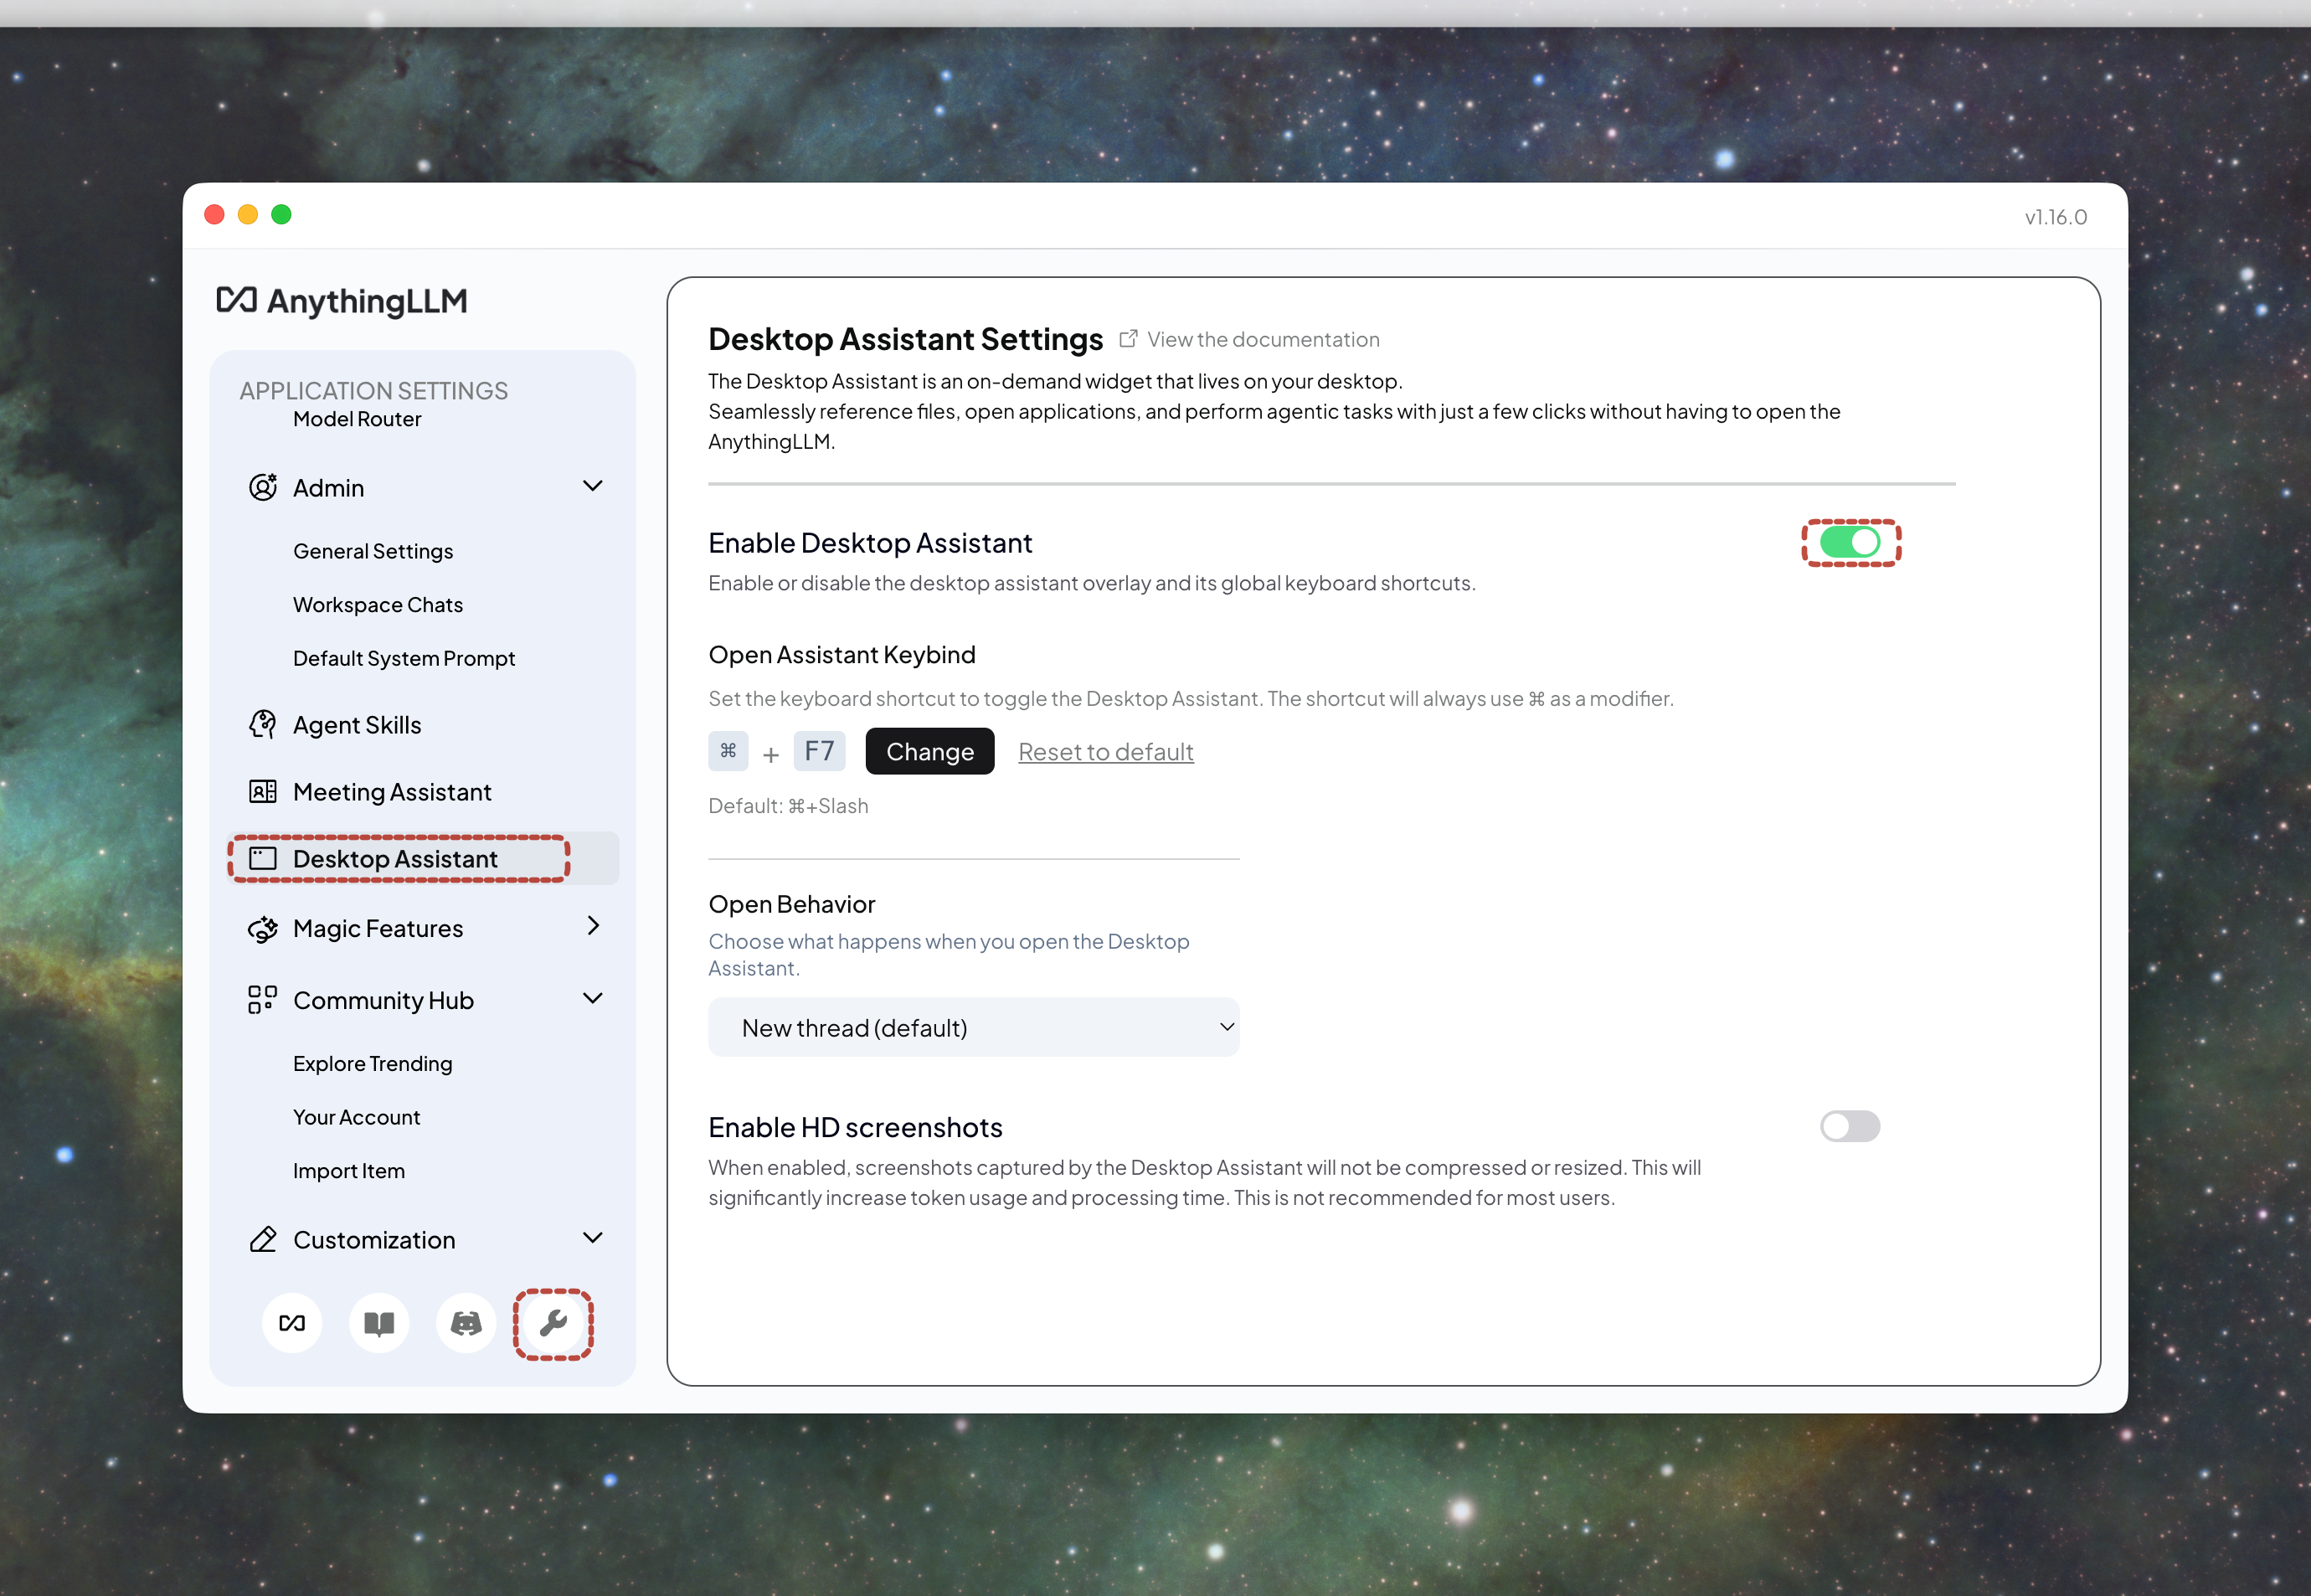
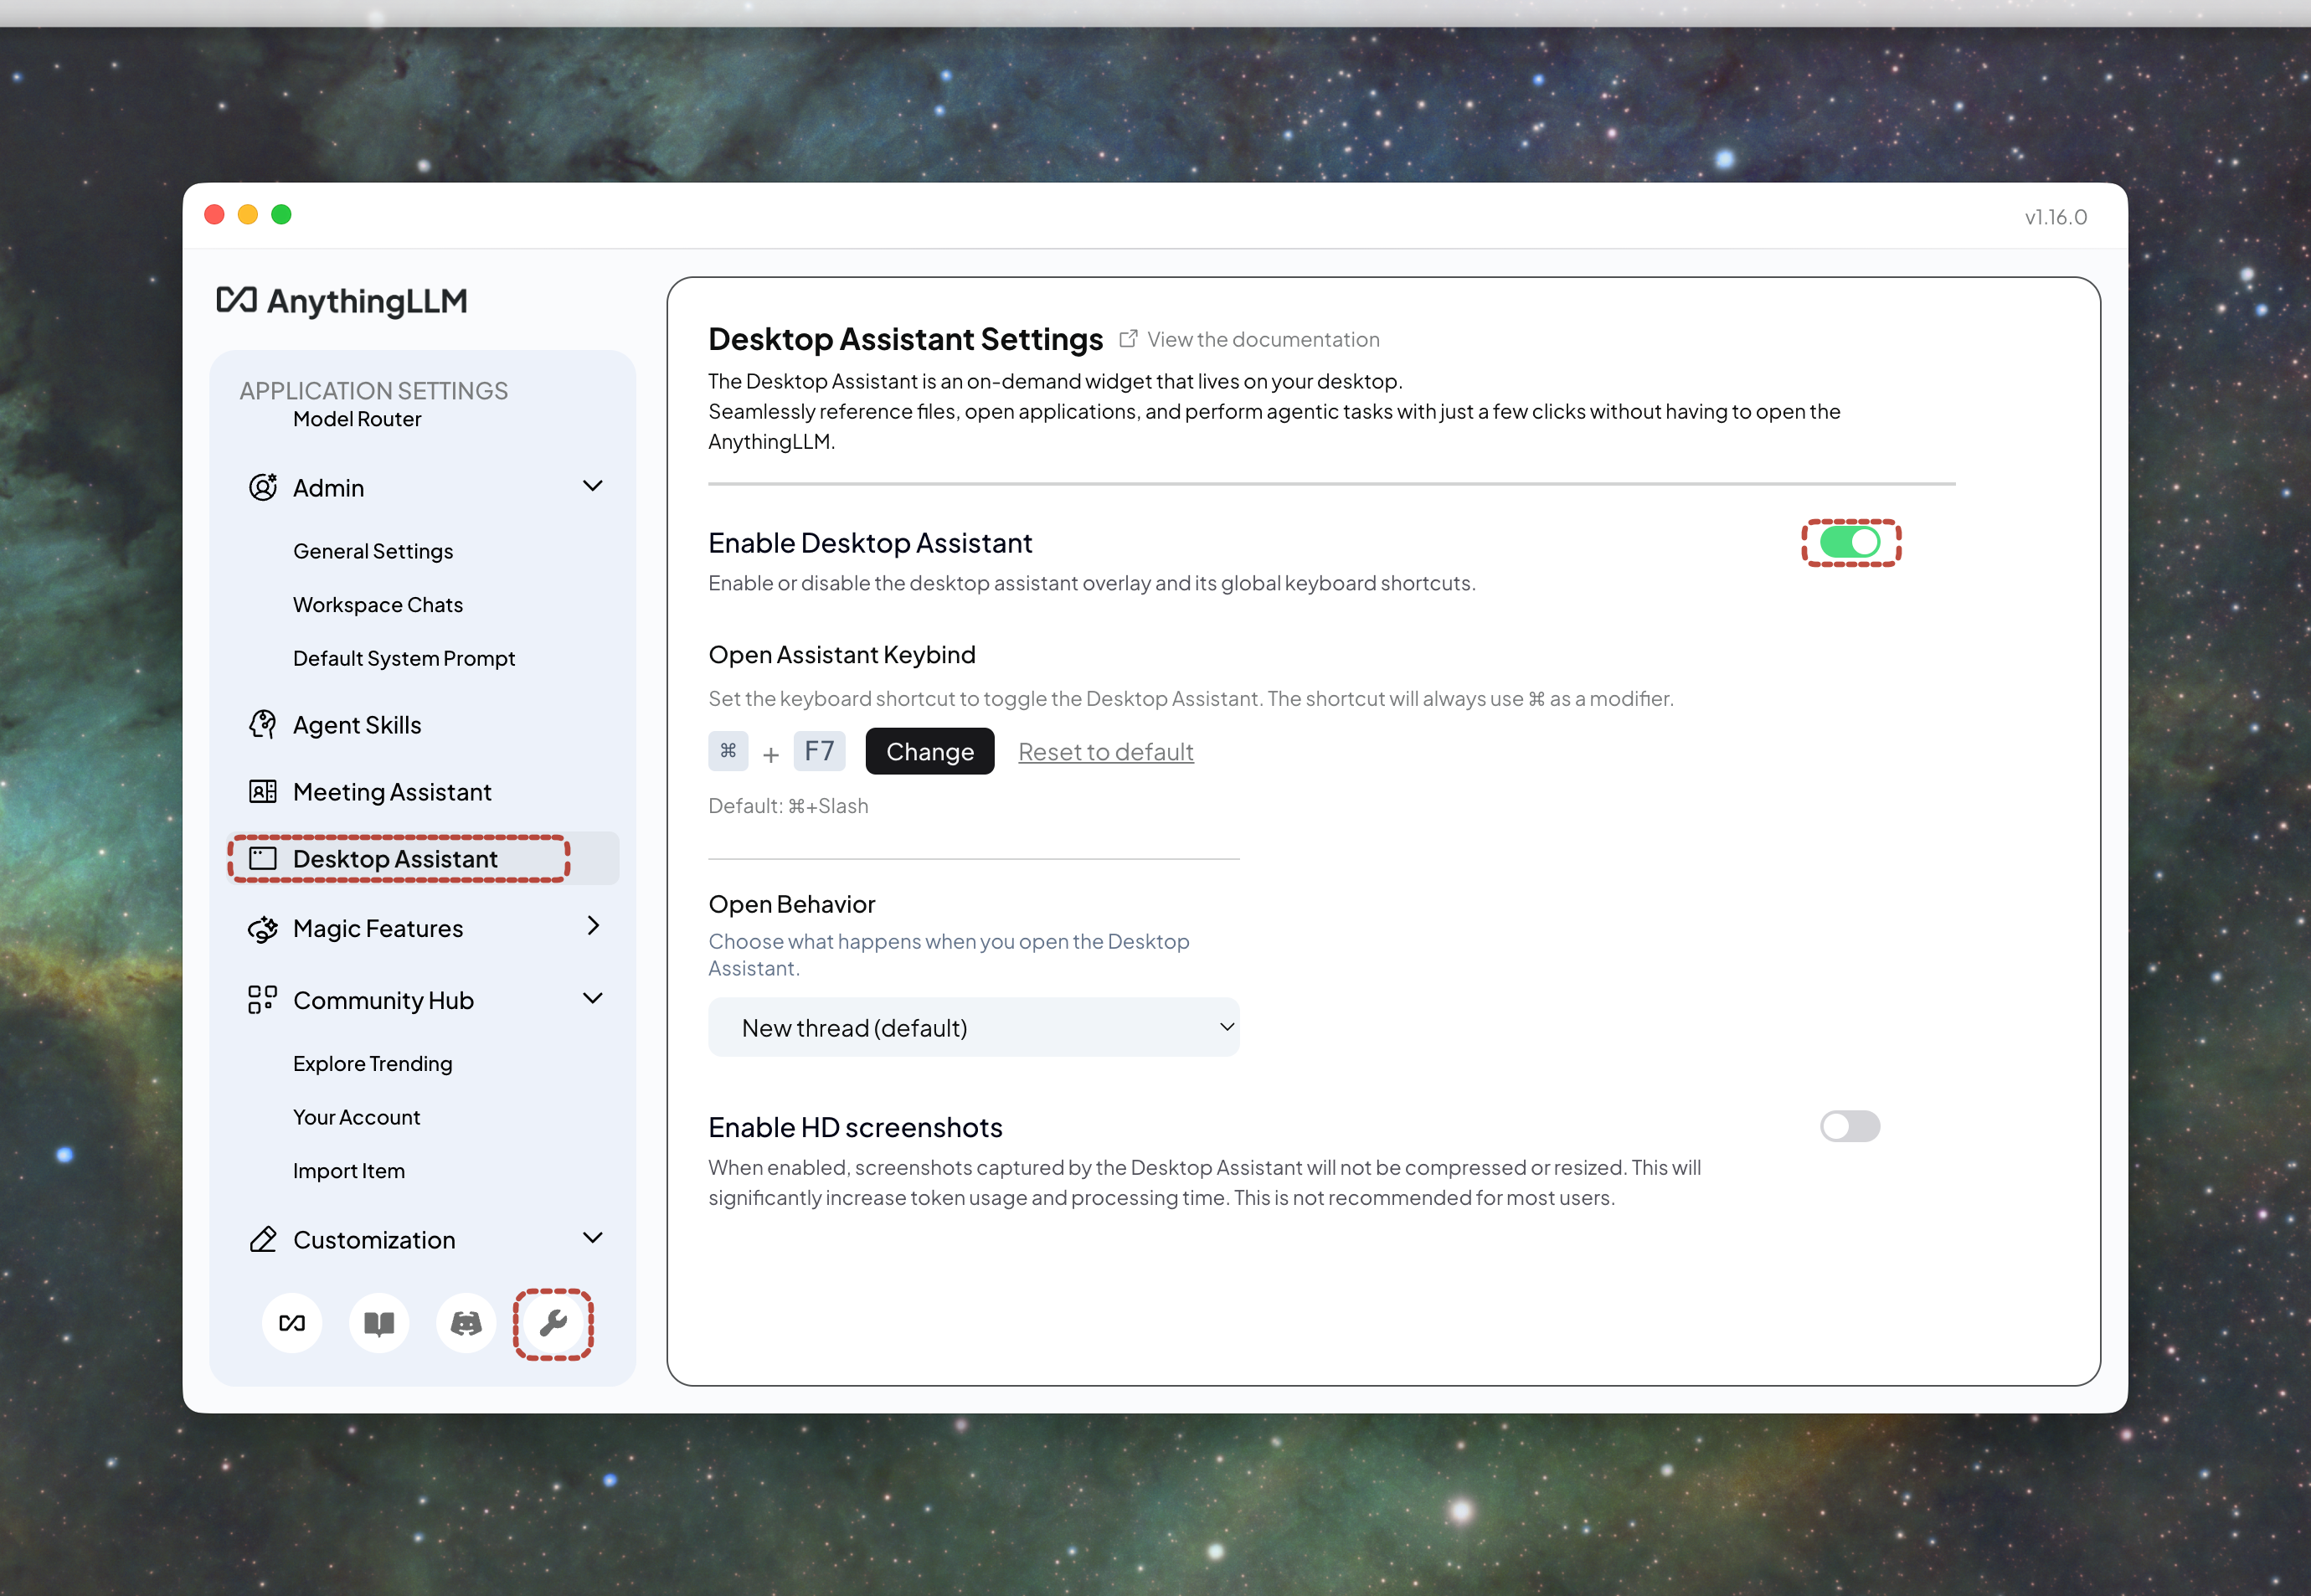
Zunächst müssen wir noch Einstellungen in unserer KI-Umgebung vornehmen. Als ersten Schritt aktivieren wir den Desktop-Agenten, welcher auf Bildschirminhalte schauen und uns so mit konkreten Hinweisen helfen kann. Der Desktop-Agent ist unter den Einstellungen wie hier gezeigt zu finden:
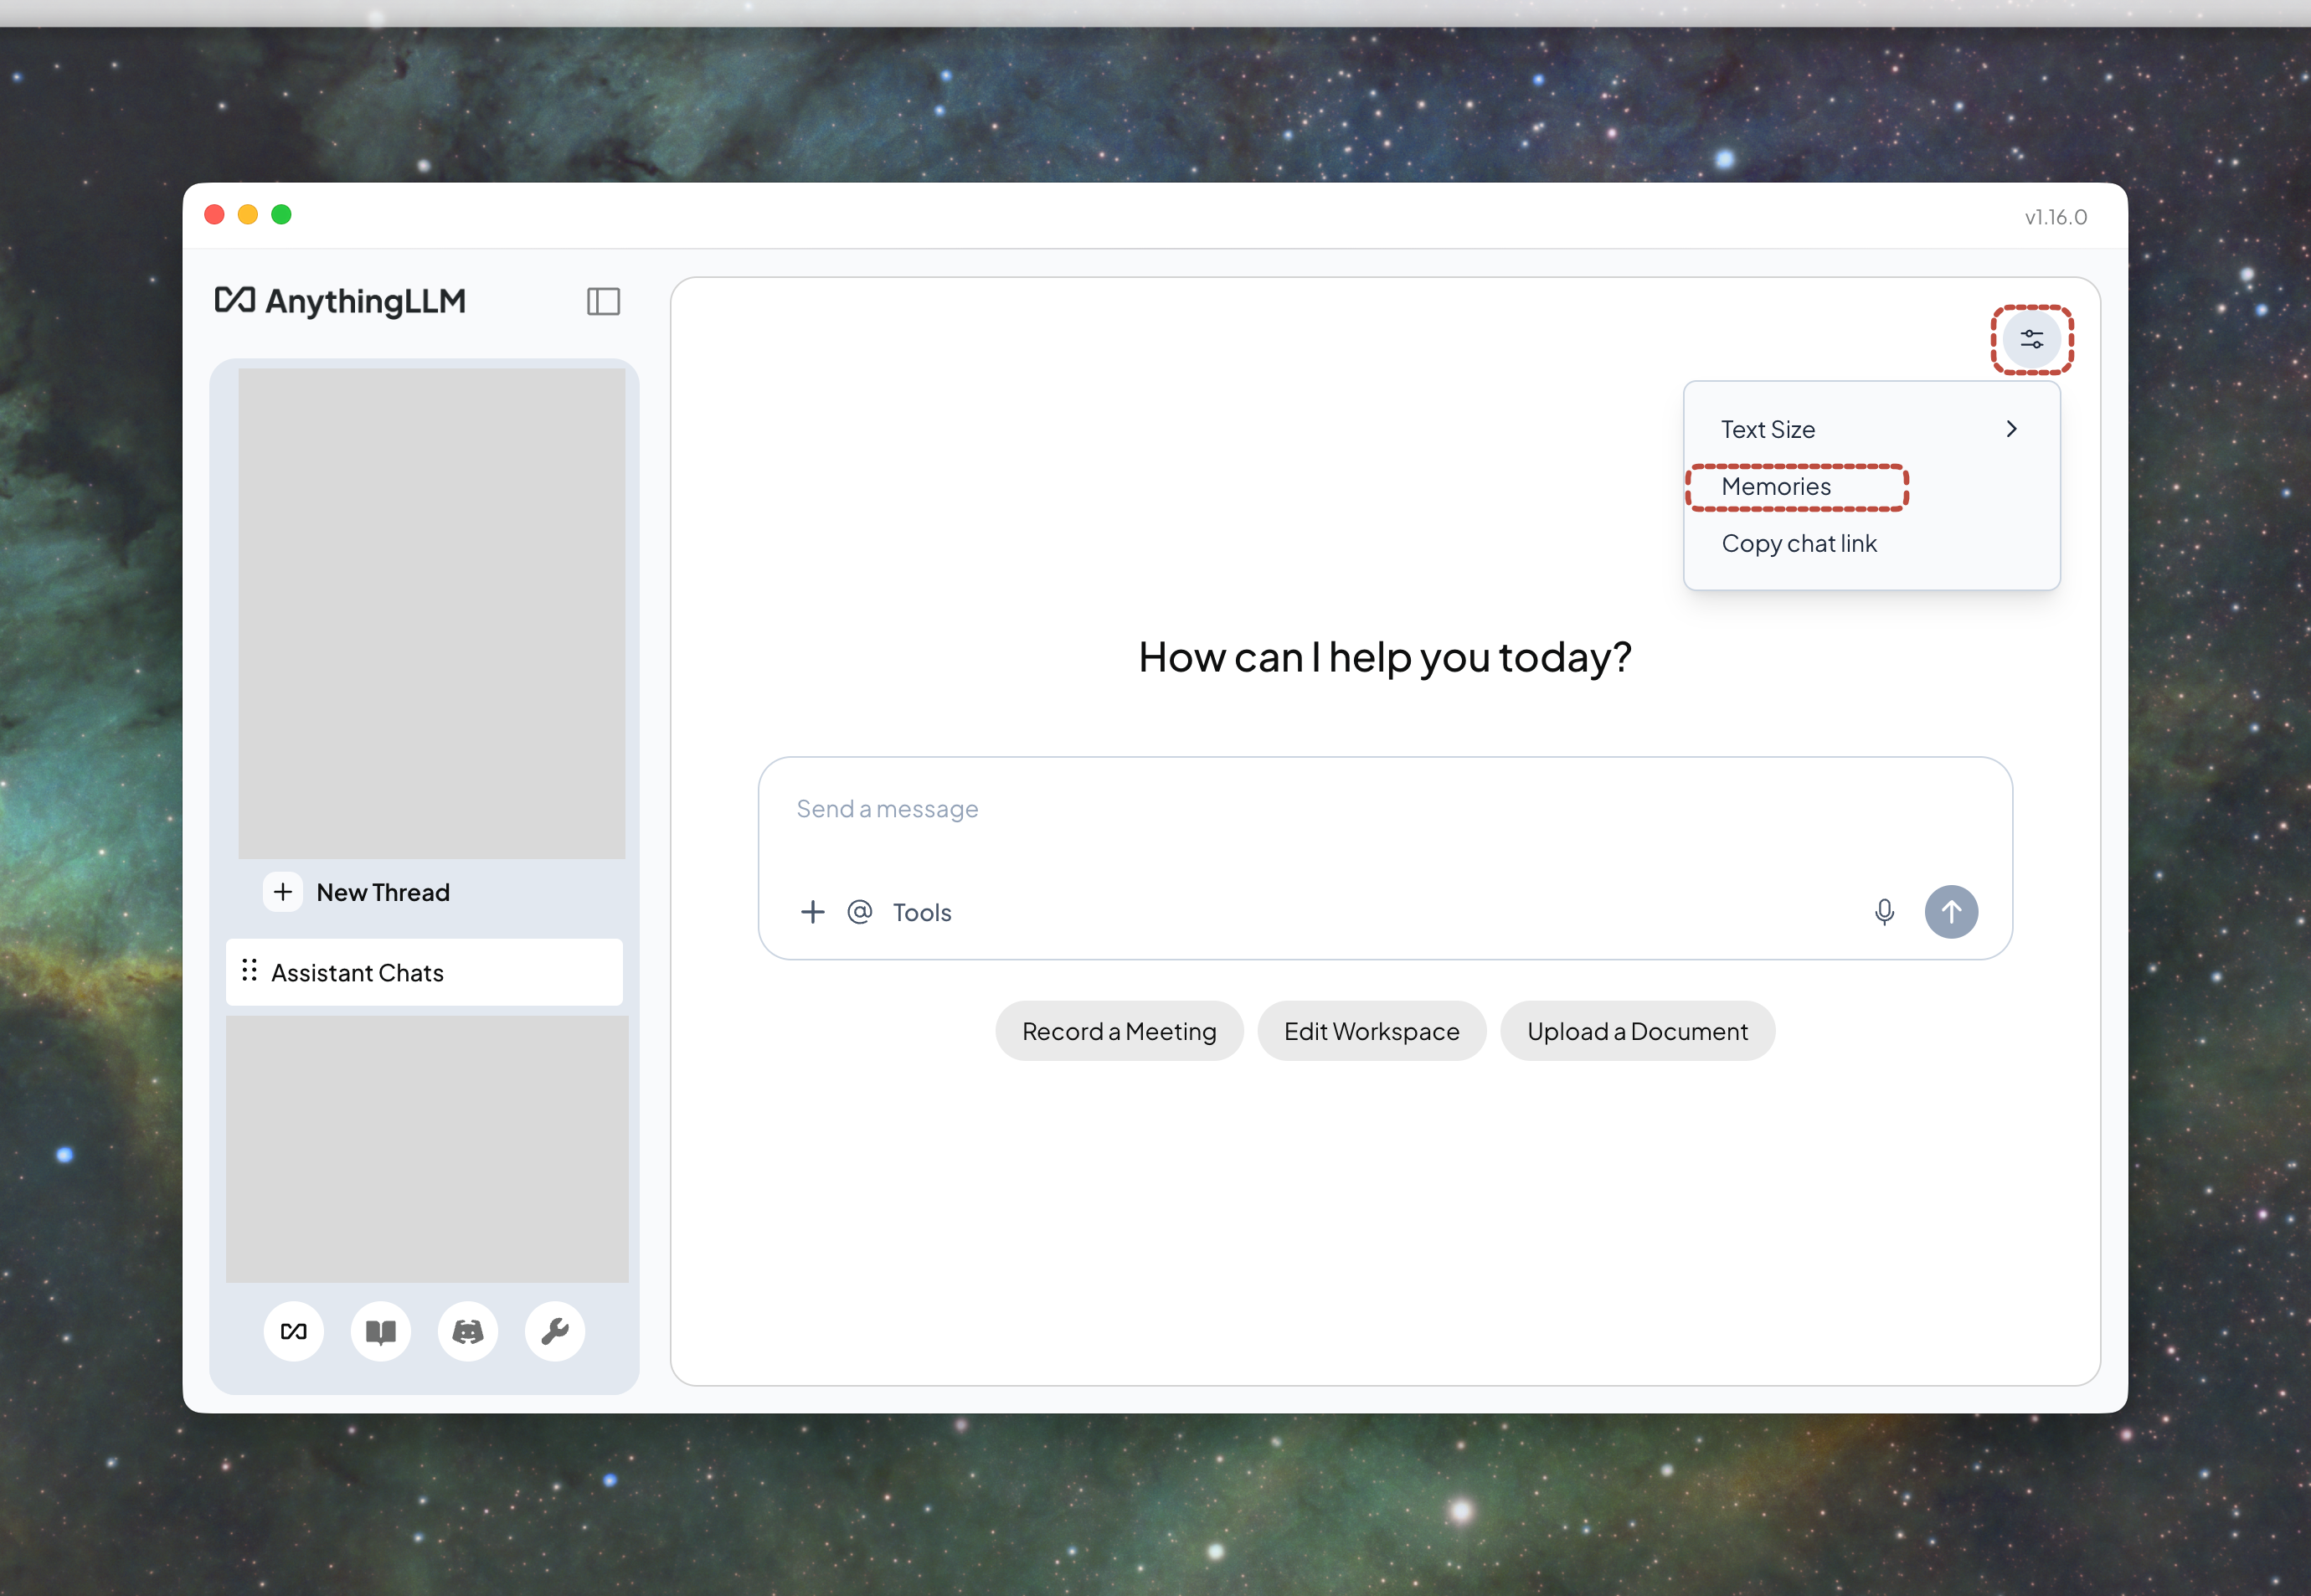
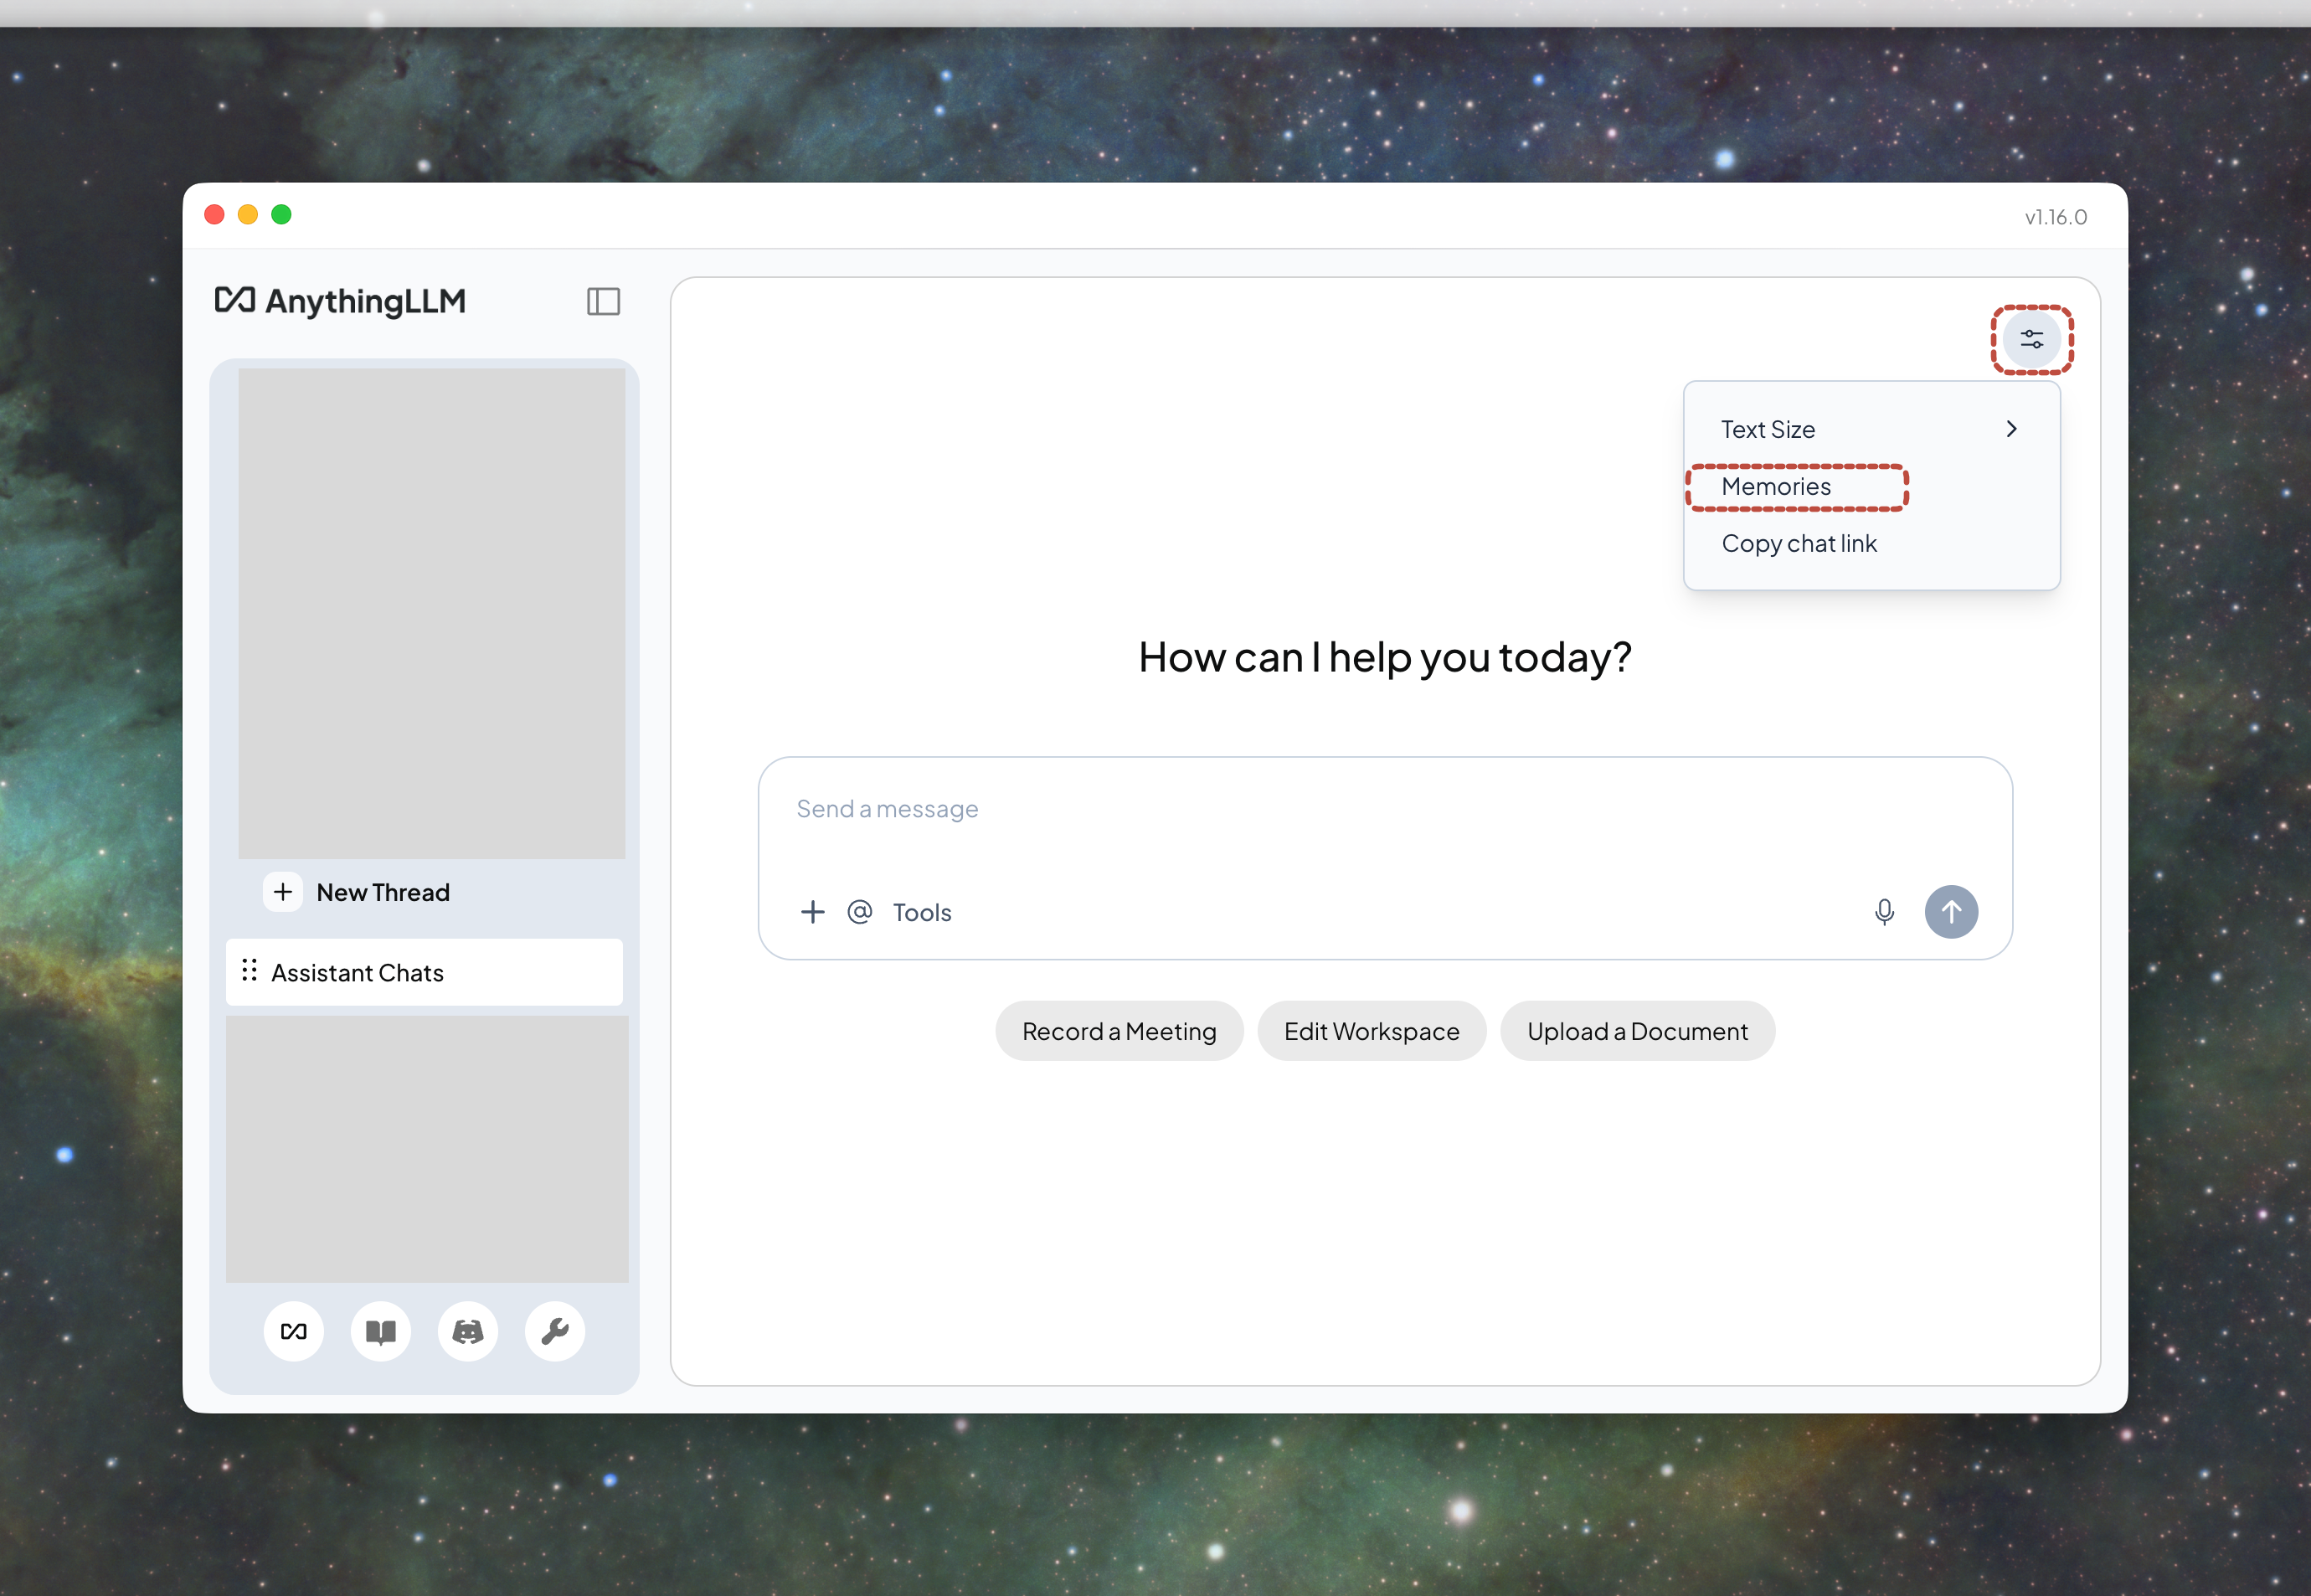
Für gute Ergebnisse ist es hilfreich die KI mit Kontextinformationen zu versorgen, z.B. welche Anwendung für welche Zwecke verwendet werden, was die persönlichen Ambitionen sind, usw. Im Prinzip sind das Informationen, die man auch einem persönlichen Trainer sagen würde. In AnythingLLM sind die "Memories" etwas versteckt im Chat-Fenster oben rechts zu finden:
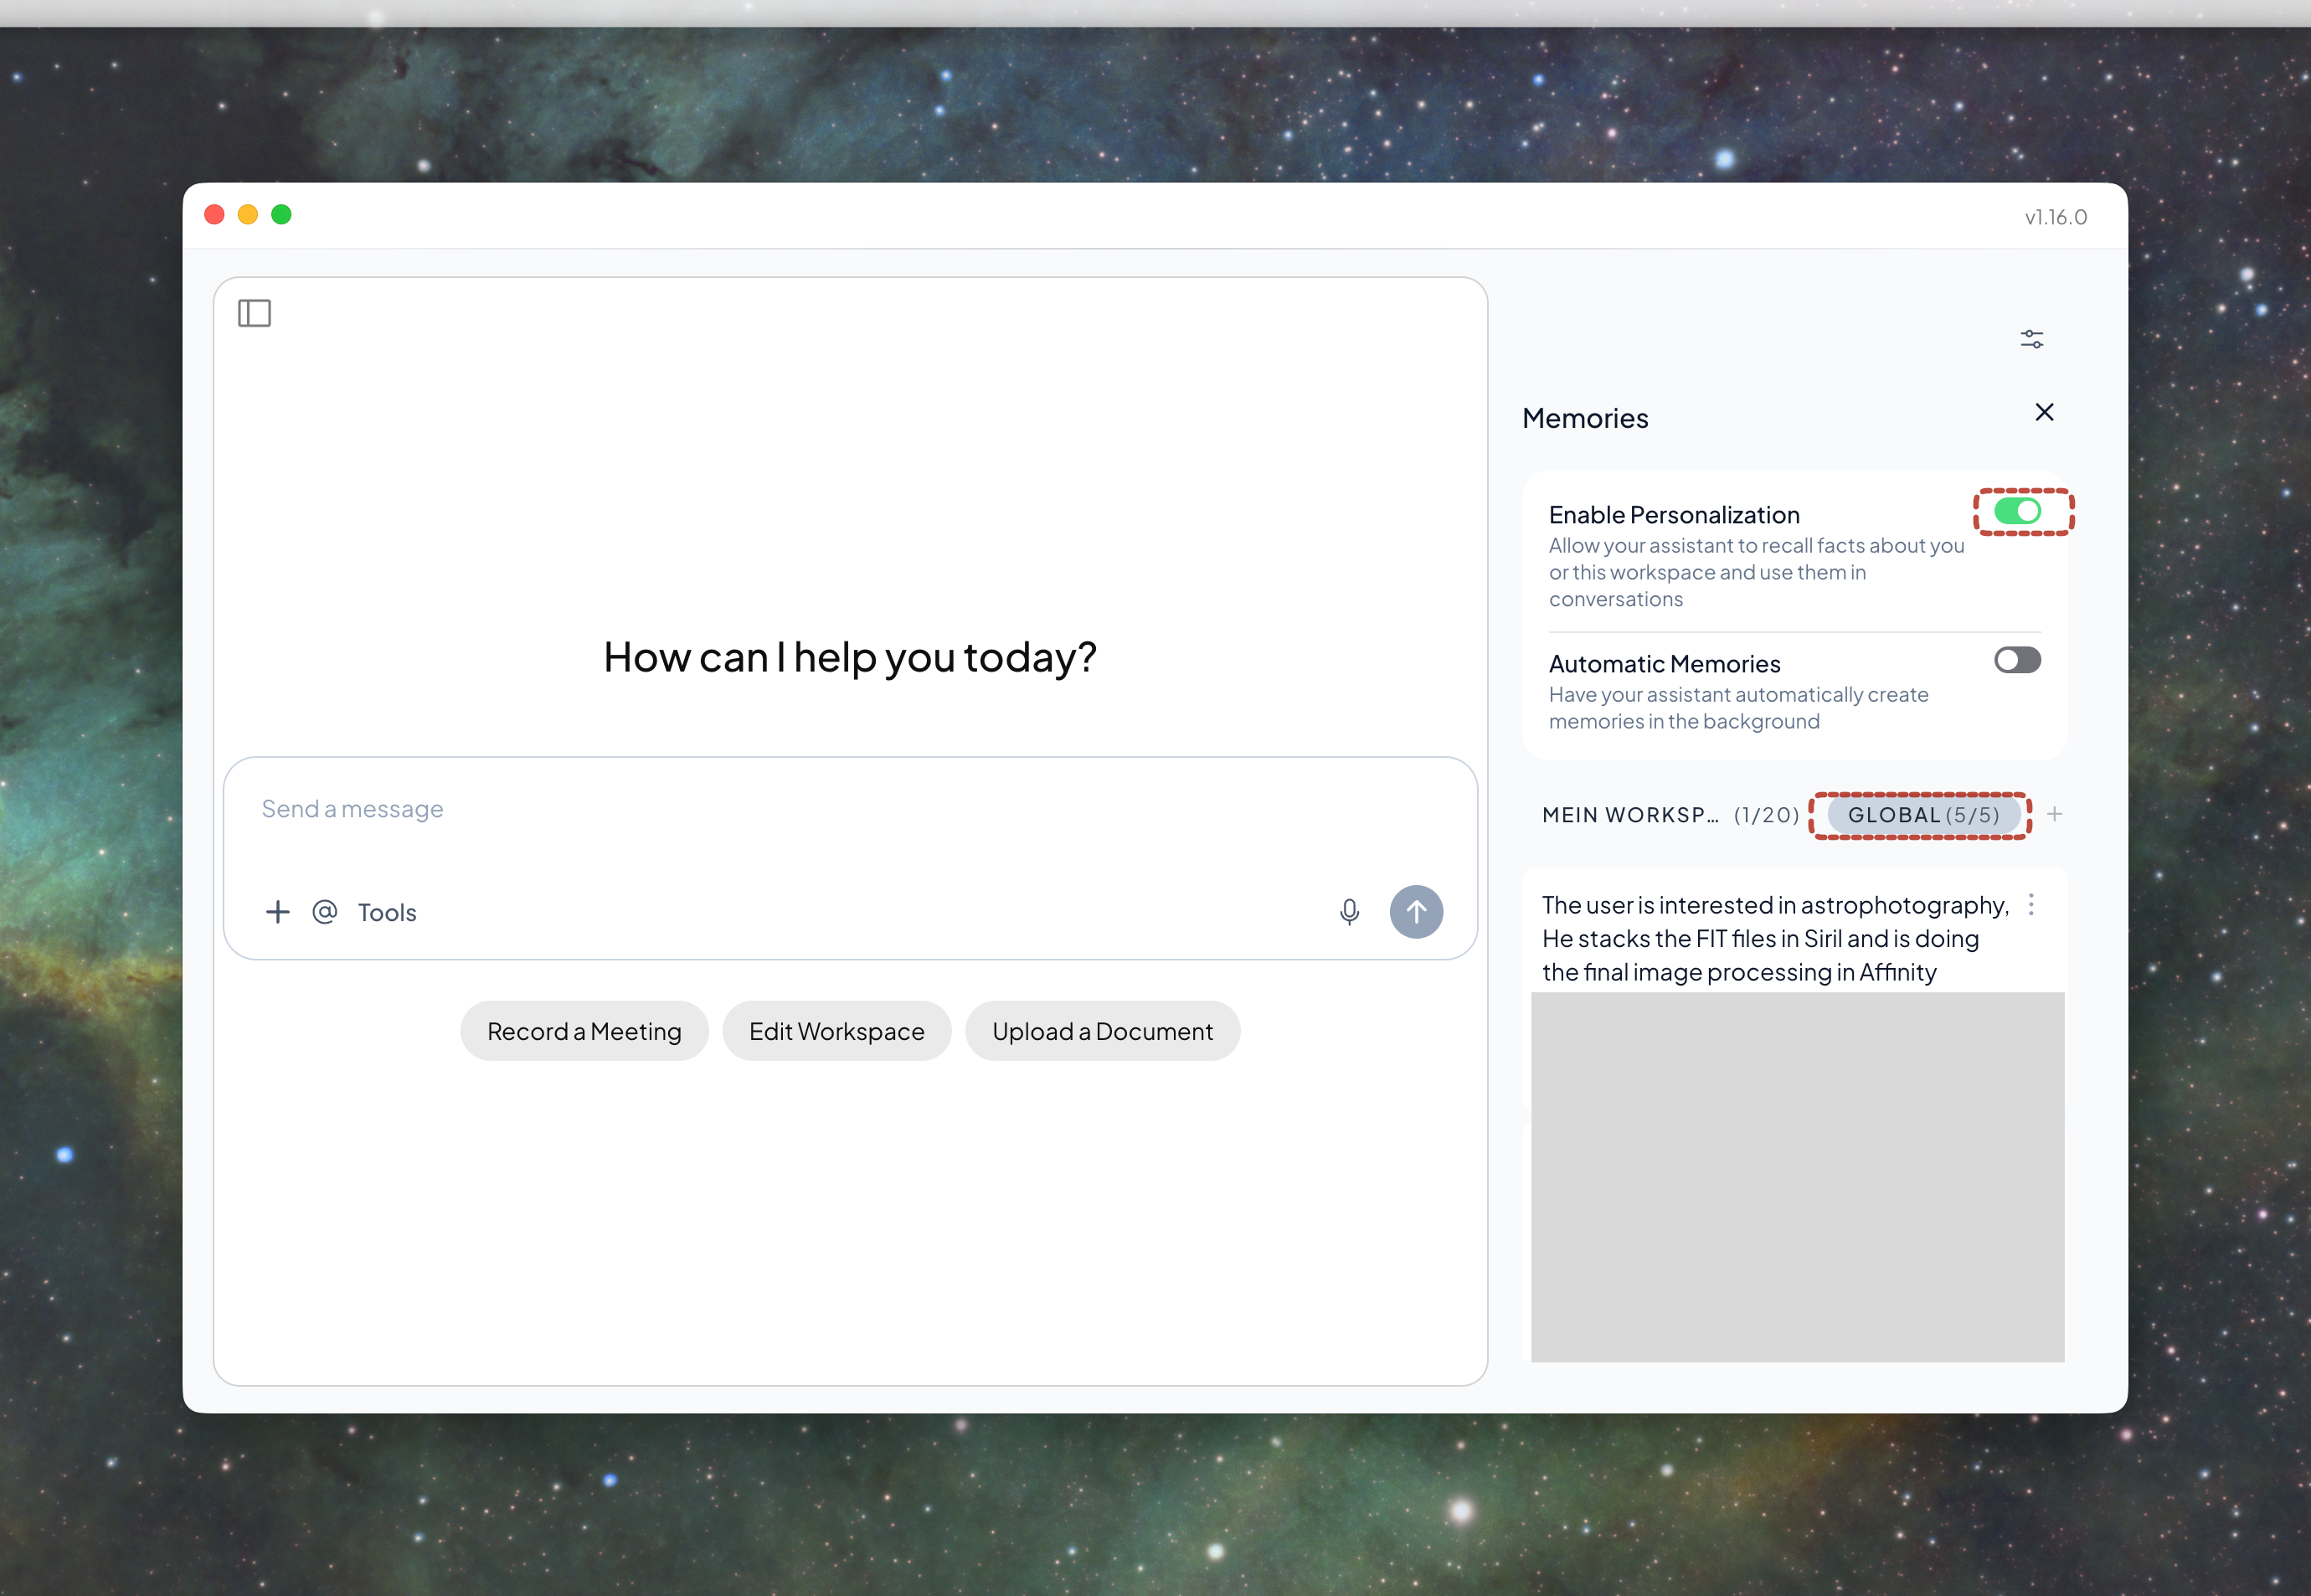
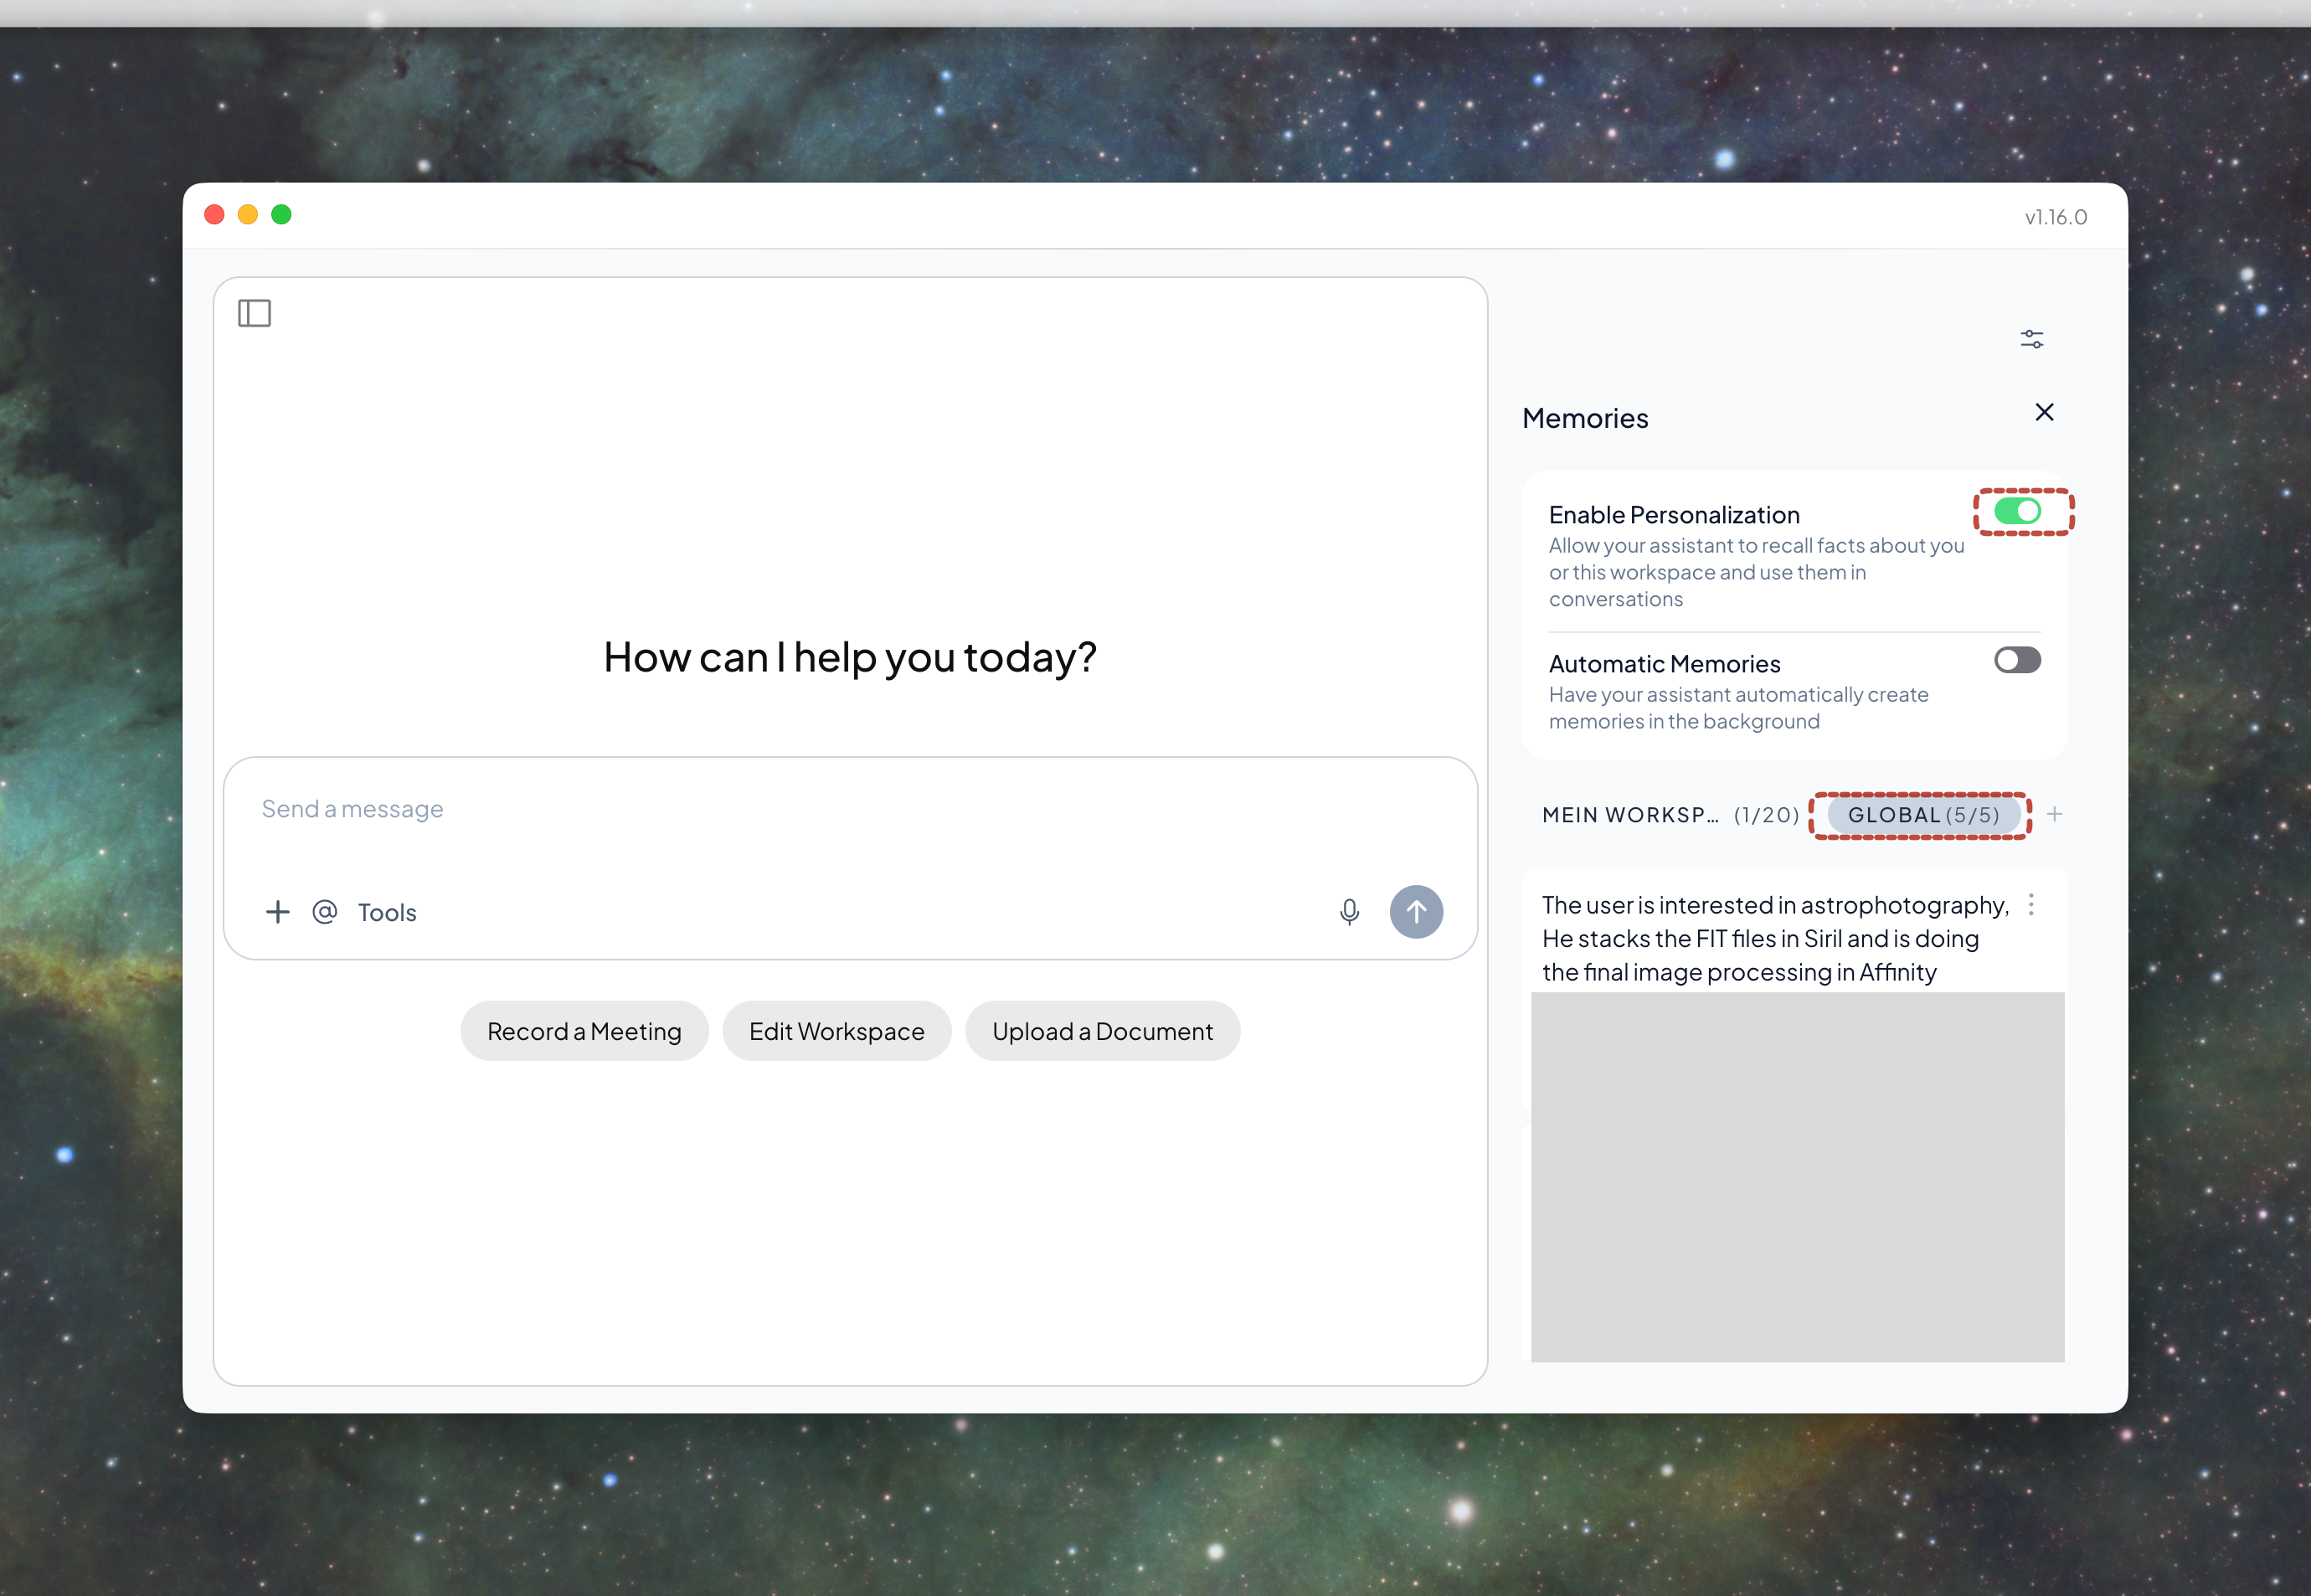
Hier kann man fest eingestellte globale Vorgaben hinterlegen:
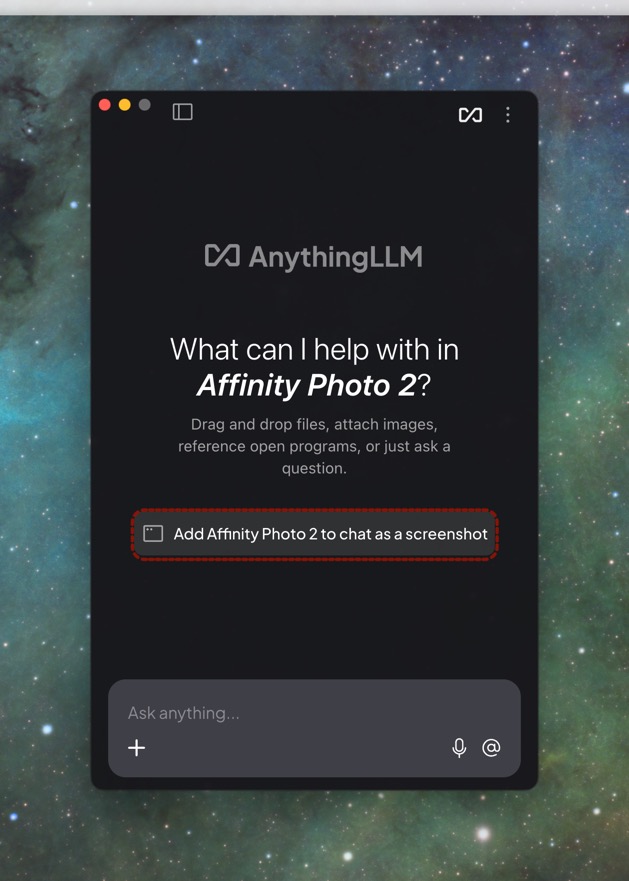
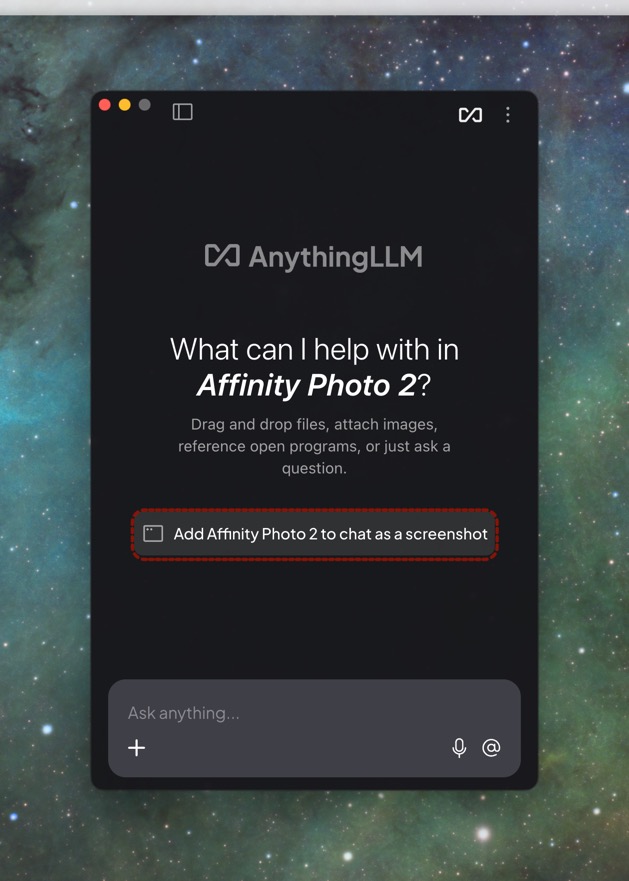
Beim nachfolgenden Beispiel habe ich gerade in AffinityPhoto an einem Bild des Nordamerika-Nebel NGC7000 gearbeitet. Mit der eingestellten Tastenkombination nun den Desktop-Agenten starten. Dieser fragt, ob die Bildinhalte der zuletzt verwendeten Anwendung verwendet werden darf:
Es kann nun eine Frage zu dem Arbeitsstand gestellt werden:
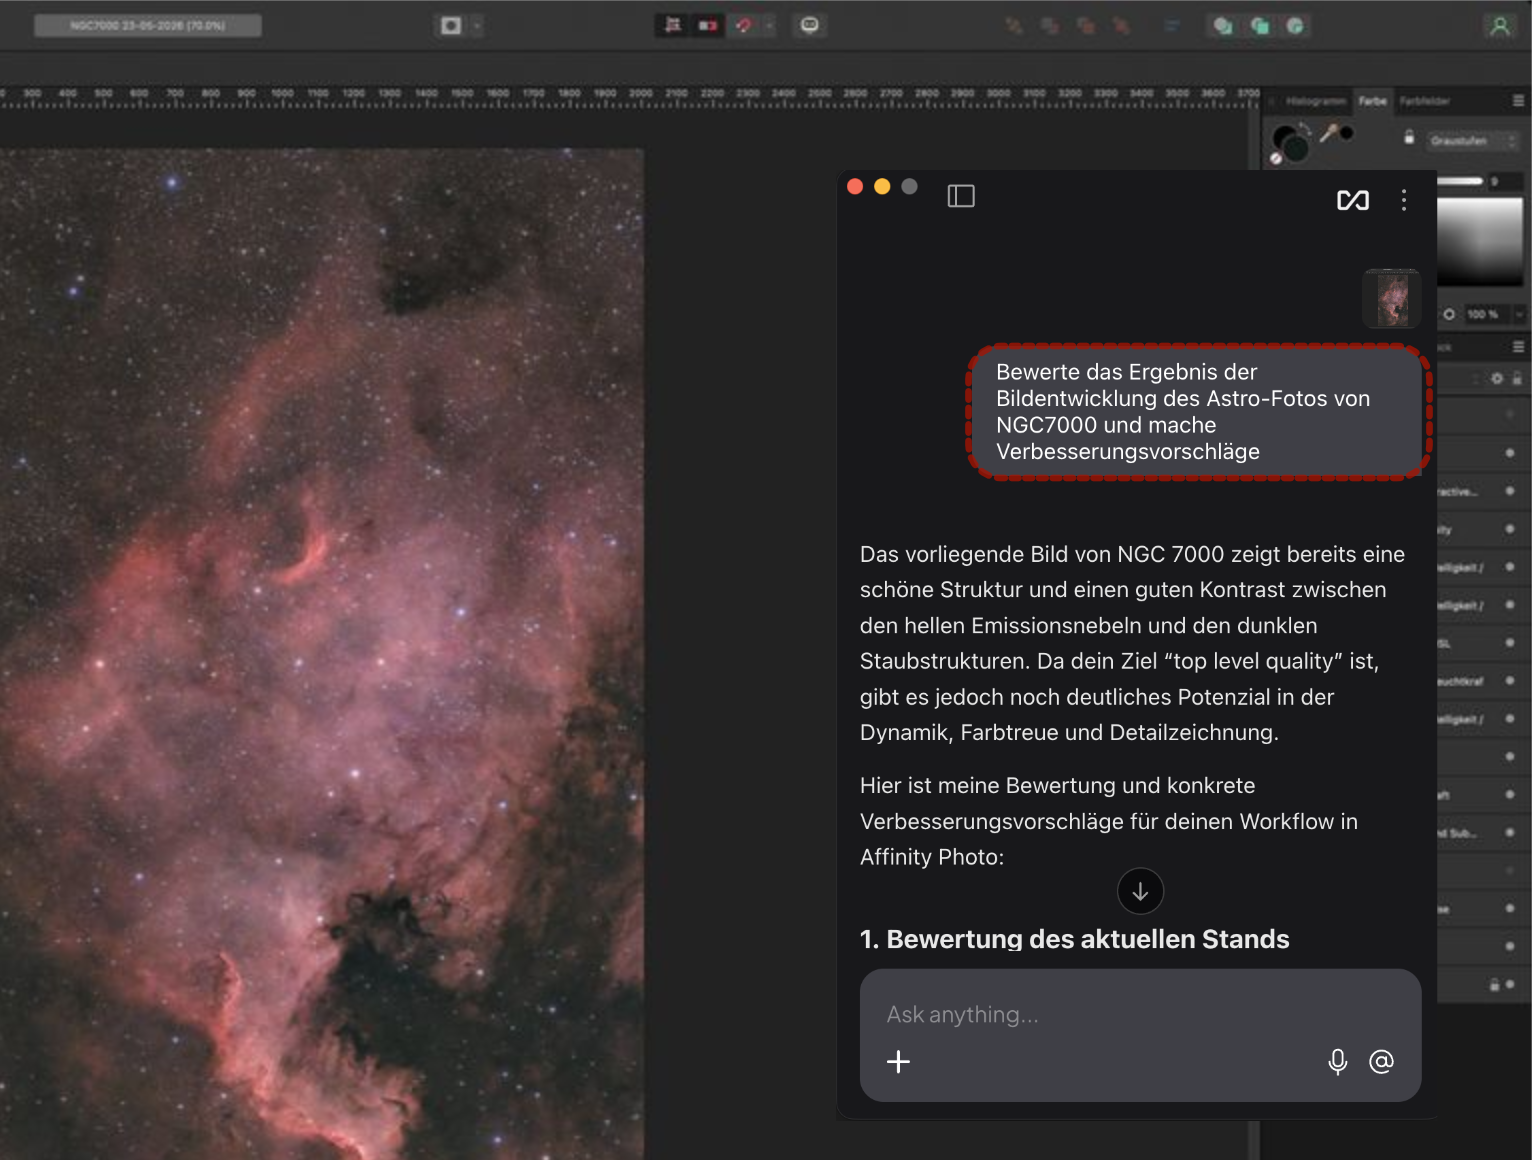
Ich habe hier nach einer Beurteilung des Arbeitsstands und Verbesserungsvorschlägen gefragt. Die hat erstaunlich umfangreich und präzise geantwortet, u.a. zu Themen wie
- Generelle Bildästhetik (z.B. "Der Kontrast wirkt etwas "flach". Die hellen Bereiche der Nebel wirken fast überstrahlt, während die dunklen Staubwolken noch mehr Tiefe vertragen könnten.")
- Rauschen (z.B. "Nutze eine sehr feine, maskierte Rauschunterdrückung nur für den Hintergrund.")
- Schlechte Übergänge zwischen Nebel und Hintergrund
- Kontrast, Dynamik, Farben (z.B. "Erstelle eine Maske, die nur die dunklen Staubstrukturen (Dust Lanes) abdeckt. Erhöhe dort lokal den Kontrast oder senke die Helligkeit leicht, um sie vom hellen Nebel abzuheben. Das erzeugt Dreidimensionalität.")
- Präsenz Sterne vs. Nebel
- Feinste Gradienten im Bild
- Überprozessierte Bereiche mit unnatürlichem Aussehen
Man kann in den folgenden Schritten interaktiv vorgehen, d.h. einige Anpassungen machen, einen Screenshot von diesem dem Chat hinzufügen (mit dem + Zeichen im Chat-Fenster) und nach einer neuen Beurteilung fragen oder spezifische Themen zu dem Bild diskutieren. Der Vorteil dieser Methode ist, dass man immer selbst die Kontrolle und Entscheidung hat, eine neutrale Meinung erhält und teilweise auf Bearbeitungsoptionen hingewiesen wird, die man selbst noch nicht kannte.
Grundsätzlich funktioniert diese Arbeitsweise auch in anderen Kontexten, z.B. Hilfe bei einer Fehlermeldung auf dem Bildschirm. Wichtig ist der KI mitzuteilen von welcher Anwendung das jeweilige Bildschirmfoto kommt, da diese Information nicht übermittelt wird. In dem obigen Beispiel musste ich das nicht machen, weil ich im "global memory" der KI vorab mitgeteilt hatte, Astrofotos immer mit AffinityPhoto zu bearbeiten.
In the first article on local AI, we explained how to set up an AI environment from the ground up. In this part, we'll show how to use the AI as a personal coach to expand your own skills.
First, we need to configure a few settings in our AI environment. As a first step, we enable the Desktop Agent, which can examine screen content and help us with specific, actionable tips. The Desktop Agent can be found in the Settings, as shown here:
For good results, it's helpful to provide the AI with contextual information—for example, which application is used for which purpose, what your personal goals are, and so on. In principle, these are the same kinds of details you would share with a personal trainer. In AnythingLLM, the Memories feature is somewhat tucked away in the chat window at the top right:
Here you can define permanent global presets:
In the following example, I had just been working on an image of the North America Nebula (NGC 7000) in AffinityPhoto. I then launched the Desktop Agent using the configured keyboard shortcut. The agent asks whether it may access the screen content of the most recently used application:
You can then ask a question about the current state of your work:
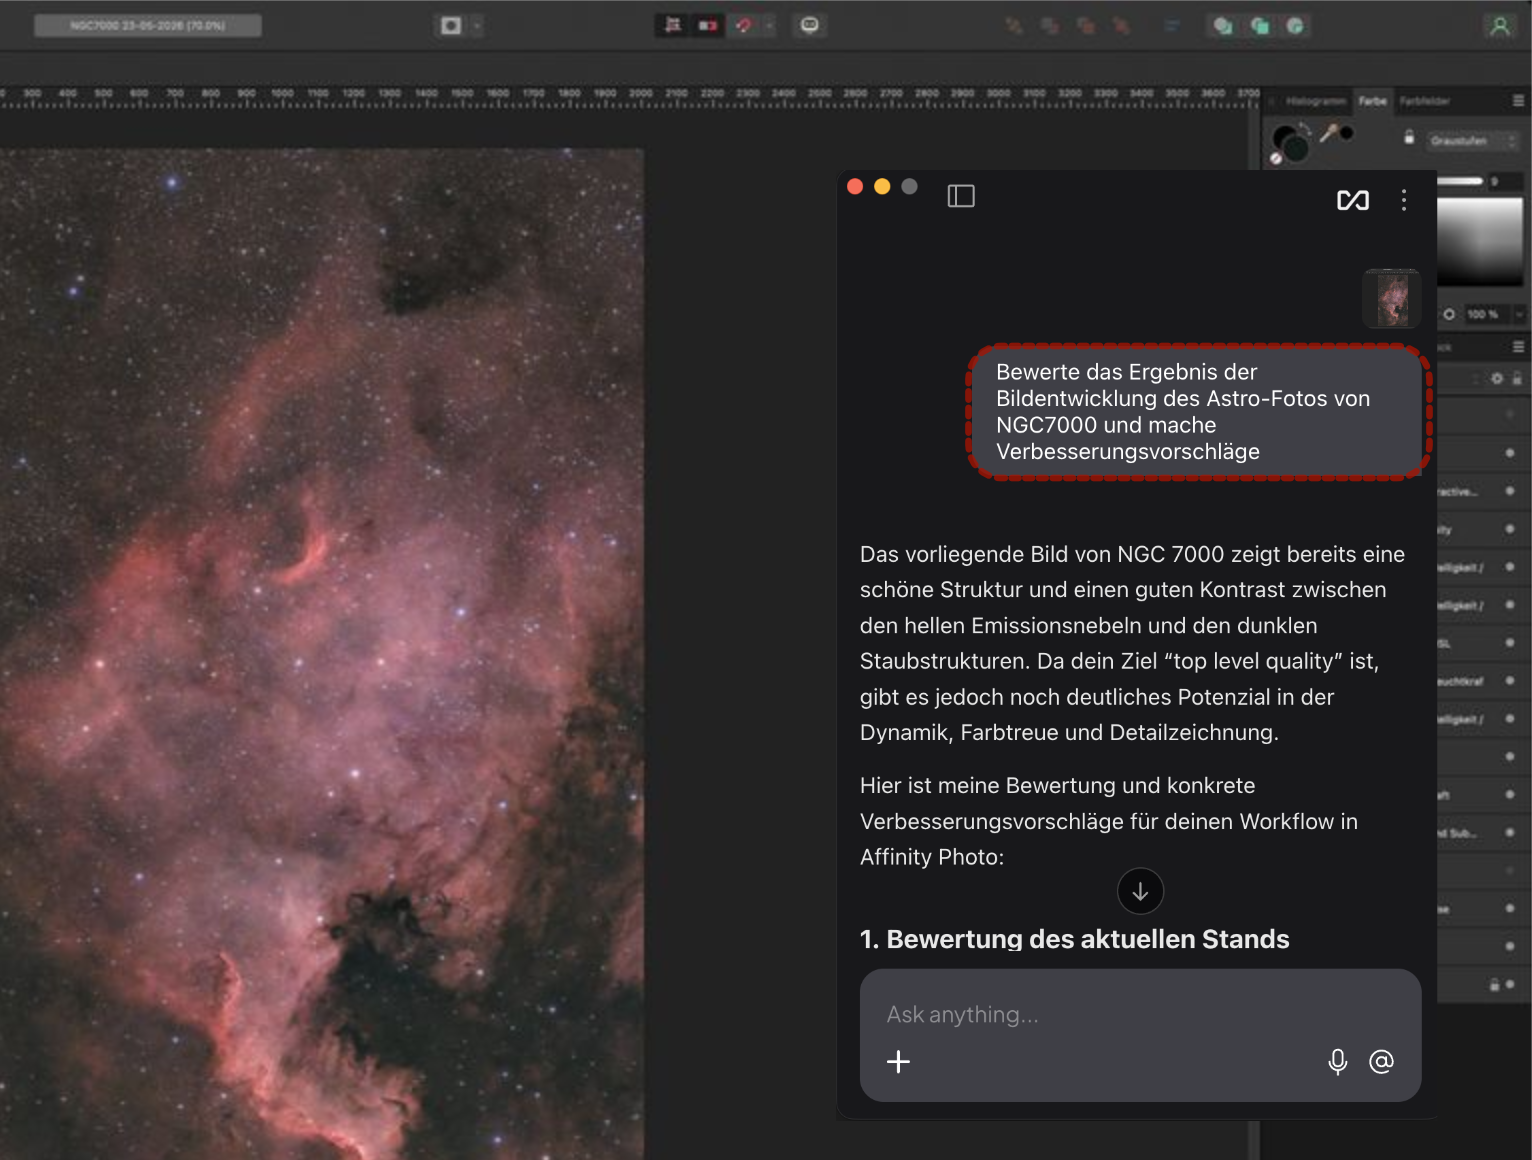
Here, I asked for an assessment of the current state along with suggestions for improvement. It gave a surprisingly thorough and precise response, covering topics such as:
- General image aesthetics (e.g., "The contrast feels a bit 'flat.' The bright areas of the nebula appear almost blown out, while the dark dust clouds could benefit from more depth.")
- Noise (e.g., "Apply very fine, masked noise reduction exclusively to the background.")
- Poor transitions between the nebula and the background
- Contrast, dynamic range, and color (e.g., "Create a mask that covers only the dark dust structures (dust lanes). Locally increase the contrast or slightly lower the brightness there to make them stand out from the bright nebula. This creates a sense of three-dimensionality.")
- Balance between star and nebula presence
- Subtle gradients in the image
- Over-processed areas with an unnatural appearance
You can then proceed interactively in subsequent steps: make some adjustments, add a screenshot of the result to the chat (using the + button in the chat window), and ask for a fresh assessment or discuss specific aspects of the image. The advantage of this approach is that you always retain full control and decision-making, receive an impartial opinion, and are sometimes pointed toward editing options you weren't even aware existed.
This workflow works in other contexts as well—for example, when you need help deciphering an error message on your screen. It's important to tell the AI which application the respective screen capture is from, since that information is not transmitted automatically. In the example above, I didn't need to specify that because I had already told the AI in its global memory that I always process astro photos in Affinity Photo.